In this article, you’ll learn why it’s important to remove a website from allowed websites on your iPhone, and provides a step-by-step guide on how to do it. Whether for parental controls or personal productivity purposes, taking charge of your browsing experience has always been challenging.
Here’s what you’ll learn in this guide:
- Why you should consider removing allowed websites on iPhone?
- How to remove allowed websites from your iPhone?
- How do you allow certain websites on iPhone?
- Effective strategies for managing allowed websites
- Alternative solutions for limiting access to certain websites
Why You Should Consider Removing Allowed Websites on iPhone?
Allowing websites on your iPhone can be convenient for accessing certain content. But there are several reasons why you may want to get rid of them. It’s important to note that allowing unrestricted access to certain websites can pose a risk to your online security and privacy. Malicious websites or phishing scams can steal your payment information or infect your device with malware.
Removing a website from allowed iPhone websites can help you improve productivity and focus. If you constantly get distracted by social media or other time-wasting sites. Taking control of the list can be an effective way to limit your access and stay focused on more important tasks.
Additionally, deleting allowed websites is crucial if you share your iPhone with others, especially children. Restricting access to inappropriate content ensures a safer browsing experience for everyone using the device.
Regularly reviewing and getting rid of allowed websites lets you keep your browsing preferences up-to-date. Over time, interests change, and so do our preferred sources of information. By revisiting the list of permitted sites periodically, you ensure that it aligns with your current needs and preferences.
How To Remove Allowed Websites From Your iPhone?
If you’ve ever used the “Allowed Websites” feature on your iPhone to restrict access to certain websites, you may find yourself wanting to remove these restrictions at some point. Here’s how you can do it in just a few simple steps.
- Open the Settings on your iPhone and scroll down until you find the option for “Screen Time.” Tap on this option to continue.
- Click on “Content & Privacy Restrictions.”
- Unlock your iPhone using your passcode and then select “Content Restrictions.”
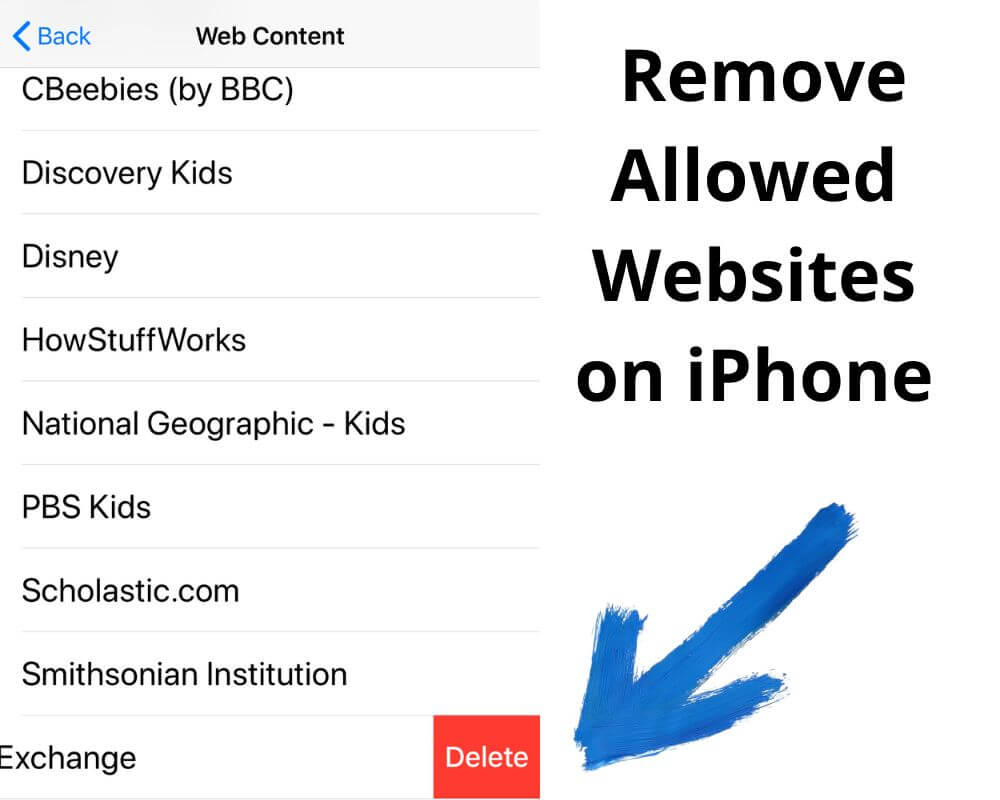
- Click on “Allowed Websites Only” under Web Content. This section will bring up a list of all the websites that are currently allowed for browsing.
- To remove an individual website from this list, simply swipe left on its name and tap the red delete button that appears.
- If there are multiple websites that you want to remove at once. Tap on “Edit” in the top-right corner of the screen and click on “Delete” in the bottom-left corner.

By following these easy steps, you can quickly delete any unwanted limitations on web browsing through the Allowed Websites settings on your iPhone.
How Do You Allow Certain Websites on iPhone?
While it’s important to know how to get rid of allowed websites on your iPhone. It’s equally important to understand how to allow certain websites when needed. Fortunately, Apple provides a simple and effective way for you to whitelist specific websites. Here’s how you can do it:
- Locate the Settings Menu.
- Scroll down and click on “Screen Time.”
- Tap again on “Content & Privacy Restrictions”.
- Click on “Content Restrictions,” then select “Web Content.”
- Under the heading “Allowed Websites Only,” tap on “Add Website.”
- Type in the website’s URL, for example, grouphowto.com, or https://grouphowto.com/system-haptics/.
- Tap “Done.” You can repeat this step for multiple websites.
Effective Strategies for Managing Allowed Websites

- Regularly Review and Update: It’s important to review the list of allowed websites on your iPhone and update it as needed. Websites can change content or purpose over time. So what may have been appropriate before may no longer be suitable.
- Use Content Filtering Tools: Consider using content filtering tools or parental control apps that allow you to block specific types of websites based on categories such as adult content, gambling, or social media. These tools can provide extra protection and help prevent access to inappropriate or distracting sites.
- Set Time Limits: If you’re concerned about excessive screen time or want to limit website access during certain hours, take advantage of the Screen Time feature on your iPhone. This allows you to set time limits for individual apps and websites, helping you manage usage more effectively.
- Communicate with Your Family: If you’re managing allowed websites for a family member’s device. It’s important to have open communication about internet usage guidelines and restrictions. Discuss why certain websites are being blocked and encourage conversations about responsible online behavior.
- Stay Informed About New Websites: The internet is constantly evolving, with new websites constantly popping up. Stay informed by keeping up-to-date with popular trends and platforms that might need added restrictions in place.
Remember that managing allowed websites is about restricting access and fostering a healthy digital environment where meaningful interactions thrive while preventing exposure to harmful or distracting content.
Alternative Solutions for Limiting Access To Certain Websites
While removing allowed websites on your iPhone can be an effective way to limit access, alternative solutions are available for those who want more control over their internet usage. Here are a few options you can consider:
- Parental Controls: If you’re looking to restrict access for children or other family members, utilizing the built-in parental controls on your iPhone is a great option. This feature allows you to limit app and website usage based on age appropriateness, ensuring they only have access to appropriate content.
- VPNs with Website Blocking Features: Some virtual private network services offer website-blocking features as part of their service package. Using a VPN with this capability can effectively block certain websites from being accessed while maintaining privacy and security online.
- Browser Extensions: Certain web browsers have extensions that allow users to block specific websites or set time limits for browsing sessions. These extensions work across multiple devices and platforms, making them a versatile solution for limiting access.
By exploring these alternative solutions, you can find the method that best suits your needs when managing internet usage on your iPhone without solely relying on removing allowed websites.
Conclusion
By following the instructions in this article, you will be able to remove allowed websites on your iPhone. Remember to take advantage of additional tips for managing websites, such as setting up restrictions for specific users or using alternative solutions like content filtering apps.
It’s important to recognize the significance of monitoring and restricting internet usage on iPhones and across all devices. Implementing these measures can protect us from online threats, maintain productivity, and create healthy browsing habits.